Introduction
This document is a quick-start guide to the phoenixNAP Virtual Private Data Center and Data Security Cloud products. Both of these products utilize the VMware vCloud Director user interface to manage virtual machines, networking and storage solutions.
This article covers step by step, how to perform initial network configuration, how to create a vApp, and lastly, how to connect a VM to the internet.
Also available are in-depth documentation for these features, as well as other functionalities within the vCloud Director. You will find it by clicking the question mark icon in the upper right-hand corner, followed by the Help link in the menu that pops up:

This document assumes that you already have your login URL and credentials from the phoenixNAP Provisioning Team. With it, you can successfully log into your vCloud Director portal.
You’ll also need the public IP information provided by the Provisioning team. The screenshots and instructions in this document cover the HTML5 version of the interface.
Initial Network Configuration
For security reasons, a new Cloud Organization initially has no networks preconfigured. When you create a virtual machine, it is, by default, isolated from the outside world. Your Cloud Organization also has a VMware Edge Gateway appliance assigned to it, which provides internet access, firewall, NAT, and VPN functionality to your virtual machines.
Creating an Org VDC Network
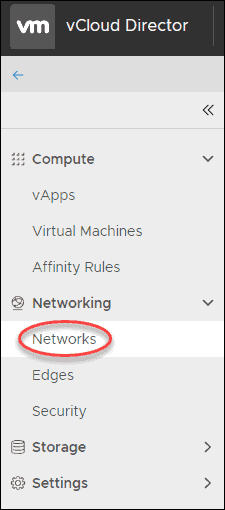
The first network to create is an organization-level Virtual Datacenter network. To do so, click on the Networks link in the Networking menu on the left side of the screen:
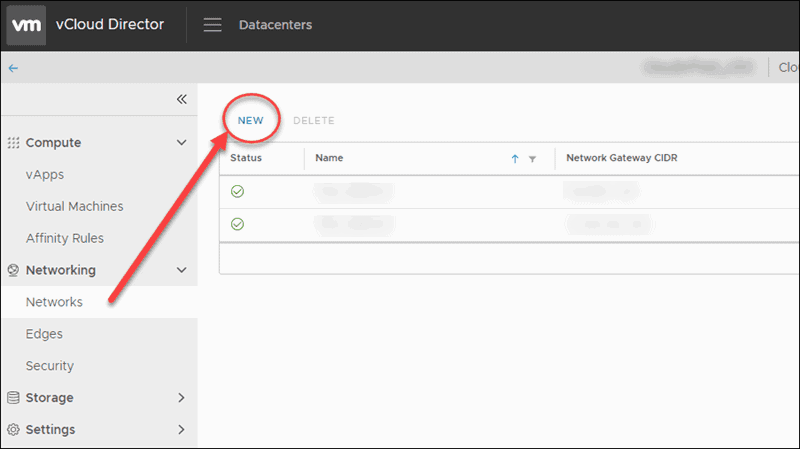
Then, click the New button on the next screen:
This brings you to Add Org VDC Network screen as seen in the image below:
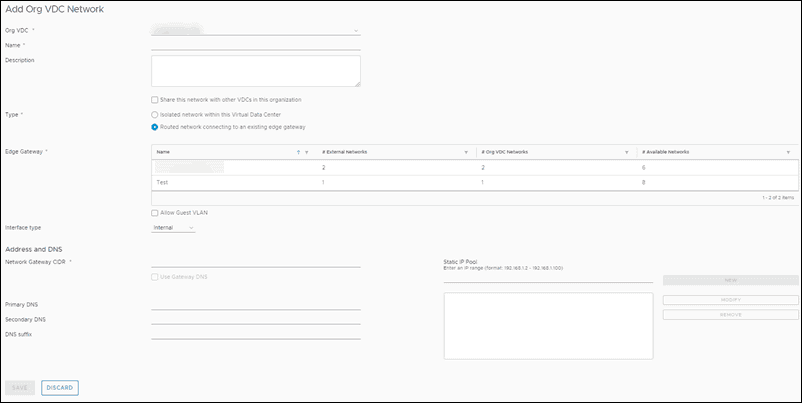
These settings should be configured as follows:
- Org VDC: In most cases, it will already be set to the name of your virtual datacenter. If not, select yours from the drop-down menu.
- Name: Create any name you want to use to reference this network in the future.
- Description: Add an optional description of this network.
- Share this network with other VDCs: This will only affect you if you have multiple virtual data centers, which is not common.
- Type: For this first network, select “Routed network” to create a network that will connect to the Edge Gateway and can reach the internet. Additional networks may be created as either ‘isolated’ (internal-only) or ‘routed’.
- Edge Gateway: Your organization will already have an Edge Gateway deployed. Click on it to select it as the Edge Gateway that this network will connect to.
- Allow Guest VLAN and Create as Subinterface: Most clients will leave these unchecked.
- Gateway CIDR: This is the internal IP to which you will want your VMs to connect to, so it can reach the internet (such as 192.260.20.1). It is followed by the network mask that matches the subnet size you wish to use (e.g., 192.260.20.1/24)
- Primary and Secondary DNS: Set these to the IPs of the domain name servers you wish to use.
- DNS Suffix: If you need a specific DNS suffix for your local VMs, enter it here.
- Static IP pool: If you want to identify a pool of IPs that will be reserved as static IPs, enter the IP range here in the format shown on the screen, such as 192.168.20.10 – 192.168.20.100.
Click “Save” to commit these settings.
Edge Gateway Configuration
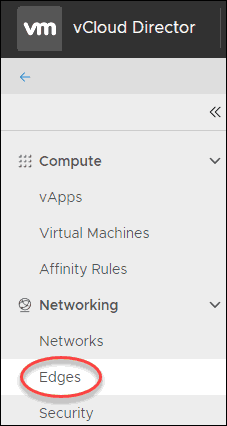
To access the Edge Gateway configuration screen, click on the Edges item in the menu on the left-hand side of the screen:
This shows you a list of Edge Gateways configured on your account. In most cases, your account will have one or two listed, with your organization’s name assigned to it:

Clicking on the Edge Gateway itself shows the current Edge Gateway settings, and will also enable the Configure Services button. Click on Configure Services to manage the Edge Gateway virtual appliance.
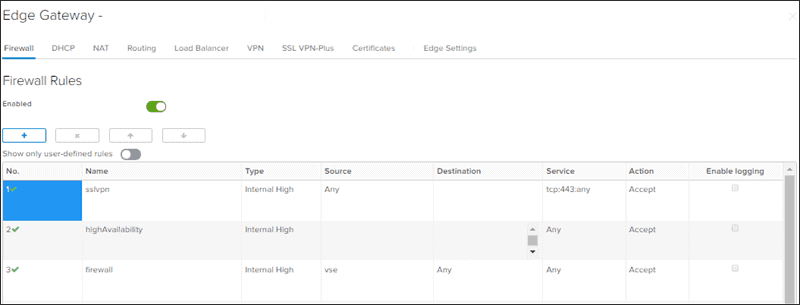
This opens up the Edge Gateway Services screen. The Firewall rules will already have a few entries pre-built in as part of preconfigured services, which you should not need to change in most cases:
To allow traffic either inbound (internet to VM) or outbound (VM to the internet), you need to create both NAT rules and Firewall rules.
Managing NAT Rules
We recommend starting with the NAT rules. Click on the NAT link in the top row of the screen to view and manage NAT rules:
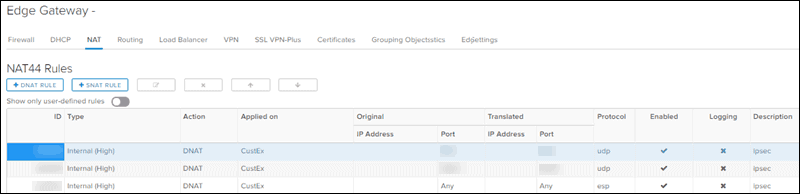
By default you do not have any NAT rules set up – this example organization already has some created as a part of configuring an IPSEC VPN.
Creating a Source NAT Rule
To allow traffic from your VMs to reach the internet, navigate to the SNAT Rule to add a SNAT (Source NAT) rule.
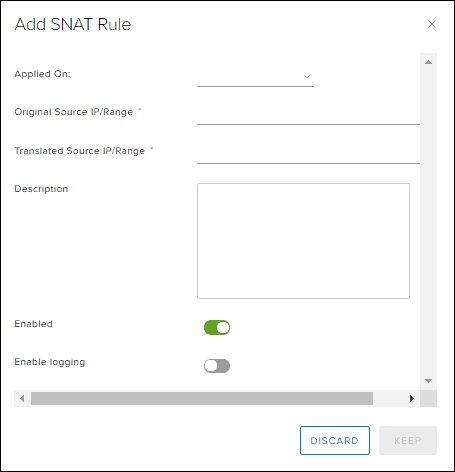
These settings should be configured as:
- Applied On: This should default to your Edge Gateway’s preconfigured external network.
- Original Source IP/Range: This will be the same internal IP and subnet as defined earlier, such as 192.168.20.0/24.
- Translated Source IP/Range: This will be the external IP that you want traffic to show up as. You will need to enter one of your usable public IPs here.
- Description: Add an optional text description of the rule.
- Enabled: This should be enabled by default.
- Enable logging: Enable optional logging of traffic matching this rule.
Click “Keep” to commit these settings.
Creating a Destination NAT Rule
If you want to allow traffic from the internet to directly reach one of your virtual machines, you will need to create a DNAT rule to translate the public IP and port to a private IP and port. Click on the DNAT Rule to add a DNAT (Destination NAT) rule.
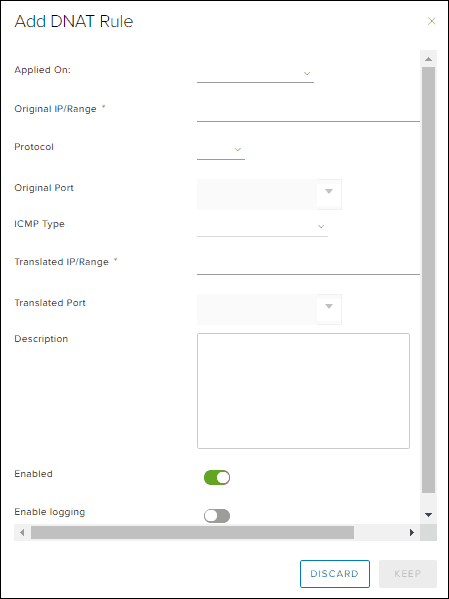
These settings should be configured as:
- Applied On: This should default to your Edge Gateway’s preconfigured external network.
- Original IP/Range: This will be the public IP your external users will use to connect.
- Protocol: This will be the IP protocol type that will be mapped with this NAT rule.
- Original Port or ICMP Type: One or both of these will be greyed out depending on the setting chosen in Protocol. This is used to identify the type of traffic that will be mapped with this rule.
- Translated IP/Range: This will be the internal IP of the virtual machine that you would like this traffic to reach.
- Translated Port: The port on the virtual machine that this traffic should be sent to.
- Description: An optional text description of the rule.
- Enabled: This should be enabled by default.
- Enable logging: Enable optional logging of traffic matching this rule.
Click “Keep” to commit these settings.
Creating Firewall Rules
With the NAT rules created, Firewall rules matching this traffic must also be created so that the traffic matching these NAT rules is allowed through. To start creating a rule, click on the + button. This enters a new rule in the list as shown below:
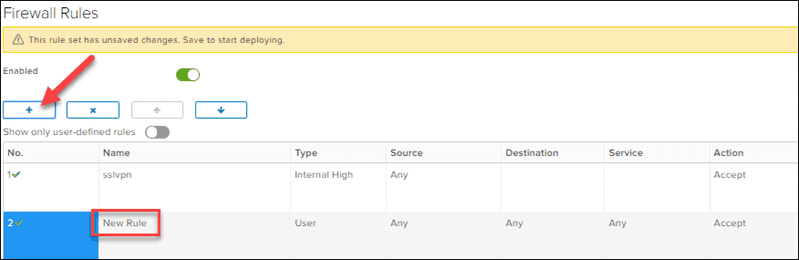
You can directly edit the firewalls rules on this screen. Double-clicking on a field allows you to edit the contents of that field. The process for creating and editing a rule is the same whether you are editing a rule for SNAT or DNAT traffic. Only the settings themselves change.
The rules in the image serve as examples. You need to consider your own desired network configuration before applying any rules to your environment.
An example rule to allow all traffic from VMs to reach the internet:
- Name: Egress traffic
- Type: User
- Source: Internal IP range (such as 192.168.20.0/24)
- Destination: Any
- Service: Any
- Action: Accept
An example rule to allow inbound traffic to port 443 on a virtual machine:
- Name: HTTPS
- Type: User
- Source: Any
- Destination: Internal IP of the VM serving HTTPS
- Service: tcp:443:any
- Action: Accept
You can also use the up and down arrow buttons at the top of the screen to re-order rules. Traffic is handled by the first rule that it matches. For example, if you have a “deny all inbound” traffic rule, this should be the last rule after all rules, that specifically allow certain types of inbound traffic.
Click “Save changes” on the right side of the screen to apply the firewall rules to your Edge Gateway.
Virtual Machine Creation and Management with vCloud Director
Within vCloud Director, virtual machines are typically grouped into collections called vApps. While it is possible to configure a VM without a vApp, it is still recommended to use them as they provide additional functionalities. For example, you can configure your networks so that VMs can communicate with each other, but not with other collections of virtual machines. vApps can also be easily duplicated if you have a collection of VMs that are always deployed together.
Creating a vApp
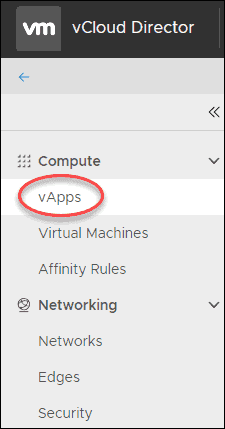
To access the vApp screen, click the vApps entry in the menu on the left side of the screen:
Click on the New vAPP button at the top of the screen to start building a new vApp.
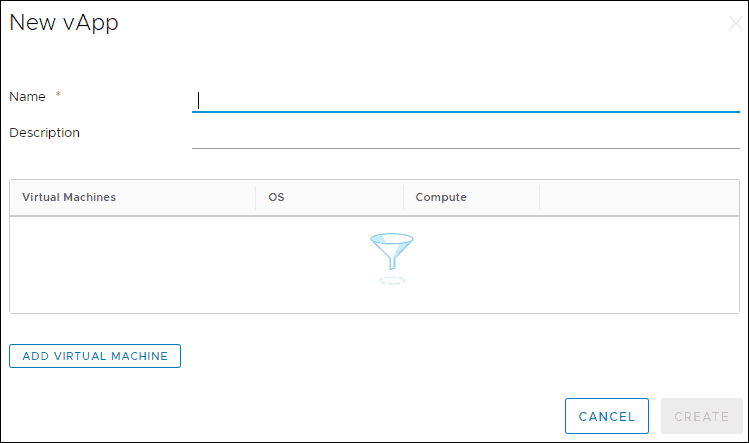
A name for the vApp is required, and an optional description text field is also provided.
Virtual Machine Creation
Then, click Add Virtual Machine to add the first virtual machine to this vApp.
If your organization has a template you wish to use, you can click on From Template and select the one you wish to clone.
You can then decide on a custom storage policy. Depending on the template, choose between the Enterprise-High and/or Enterprise-All-Flash storage solution.
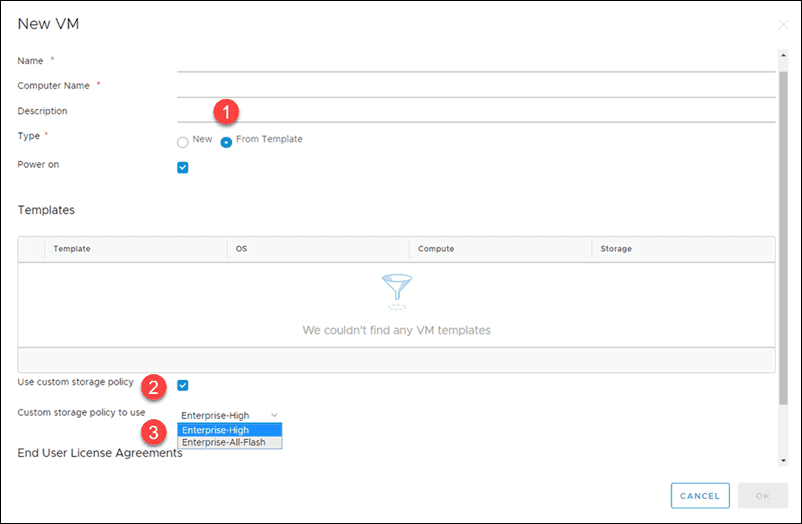
Alternatively, you can choose not to use a template. To see the full list of settings, set the Type to New:

These will be configured as follows:
- Name: The name you want to display for this VM within vCloud Director.
- Computer Name: The hostname of the guest system.
- Description: An optional text description of the machine.
- Type: Set to New unless using a template.
- OS family: Set this to the operating system family that best matches your desired guest OS.
- Operating System: Set this to the specific operating system you plan on installing within the guest OS. Note that this only configures the VM for compatibility with this guest – it does not actually install the guest OS selected.
- Boot image: If you have installation media uploaded to your catalog, you can select it here, and it will be automatically connected to the VM upon creation. If not, you can connect it manually later on.
- Size: This will pre-populate with a list of common VM sizes based on the operating systems selected. Select a size from the list shown.
- If none of the shown settings match your desired configuration, click “Customize” to be taken to the detailed sizing settings, where you can manually configure the following:
- Virtual CPUs: This is the total number of virtual CPUs that will be assigned to the VM. One virtual CPU is approximately equal to one physical CPU core.
- Cores per socket: This controls how many sockets the guest OS will see. It does not modify the number of cores, only how they are presented to the guest. In most cases (and especially for VMs that are not very large), this should be set to be the same as the Virtual CPUs setting.
- Memory: Virtual RAM assigned to the VM, shown in megabytes.
- Storage: This allows you to add and configure the size of virtual hard disks.
- Networking: By default, this will be connected to your routed network created earlier. If you need to change the network, IP allocation, or add more virtual NICs, click the Customize button.
Click the OK button to apply these settings to the VM. This will return you to the Build new vApp screen. You may repeat the process above if you want to add more virtual machines at this time, or you can do that later.
Once you have added your initial virtual machine(s) to the vApp, click Build to create the vApp.
Once it has been created, it will show an entry as this one below, on the vApp screen:
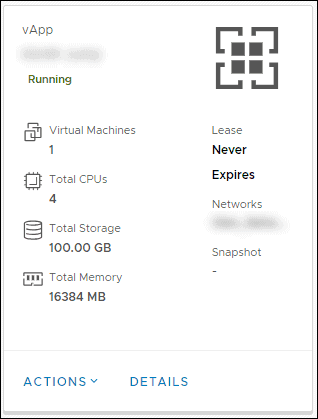
The buttons at the bottom allow you to control the vApp as a whole, or modify it:
- Actions: This enables you to power on, power off, suspend, or reset the entire vApp.
- Details: This opens the vApp and shows you a detailed list of the VMs, as well as additional settings related to the vApp:
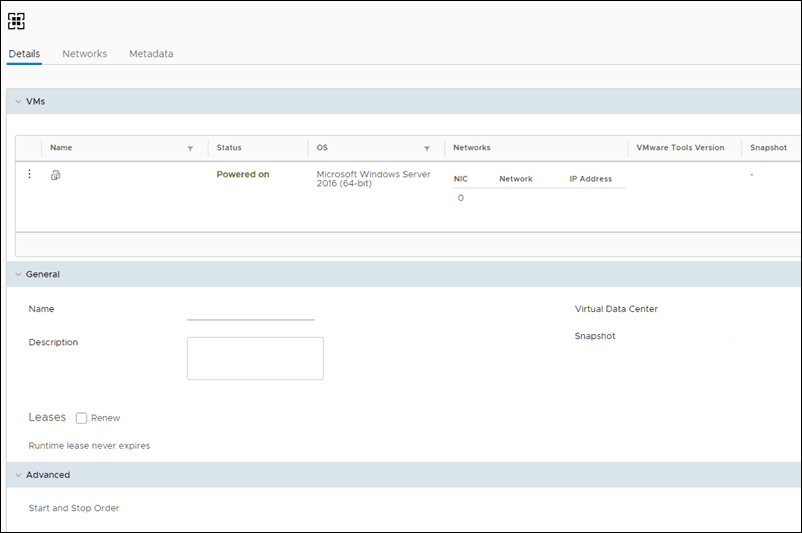
Clicking on the Virtual Machine in the top window brings you to the settings of that VM, which allows you to further customize it and its virtual hardware.
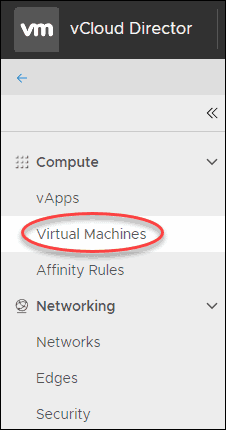
Alternatively, you can also click on the “Virtual Machines” item in the menu on the left-hand side, and see a full list of all VMs in all vApps:
The VMs on this screen will each have an entry as shown:
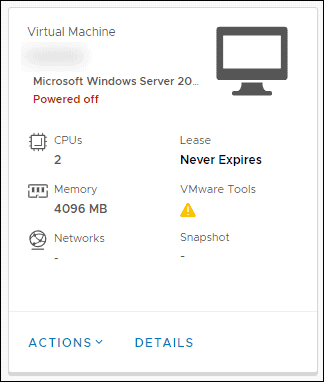
If you have not already connected install media to a VM, you can do it on this screen by clicking Actions, then Insert Media.
If you have already connected install media or created a VM from a template, you can power on the VM, then click Actions, and Launch Web Console to manage the VM directly.
Independent Disks
The use of independent disks with the vCloud Director allows updating virtual machines without impacting the underlying data. The feature is designed to enable users to create virtual disks that can be attached to and detached from virtual machines.
You can find this option in the menu under Storage. To create a new independent disk click on New.
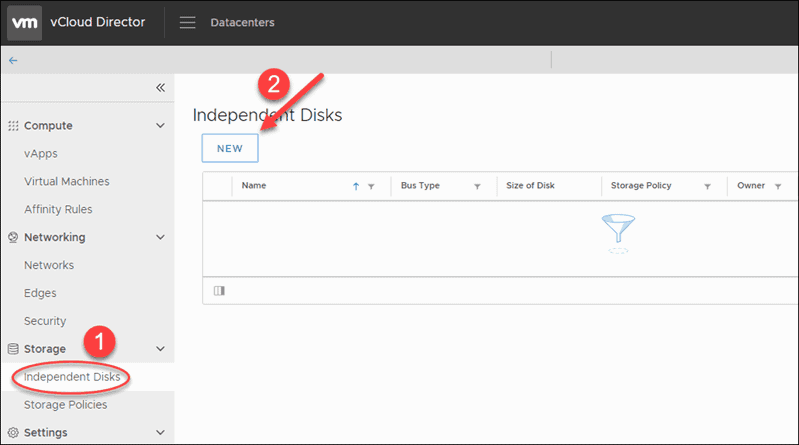
This opens a new window where you decide on the name, an optional description, storage, size, bus and bus sub-types of the independent disk.
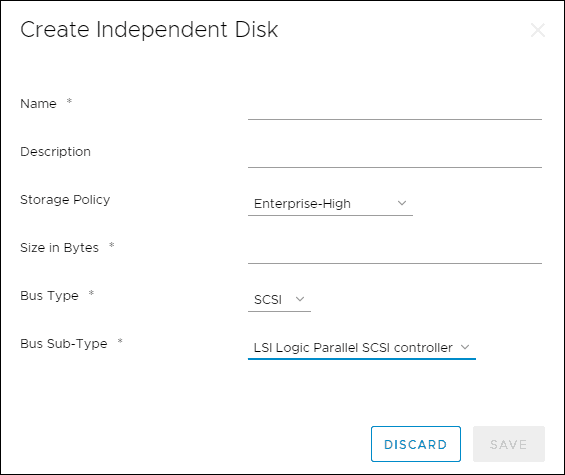
Note: If you are interested in getting the Enterprise-All-Flash storage solution, please contact your sales representative for more information.
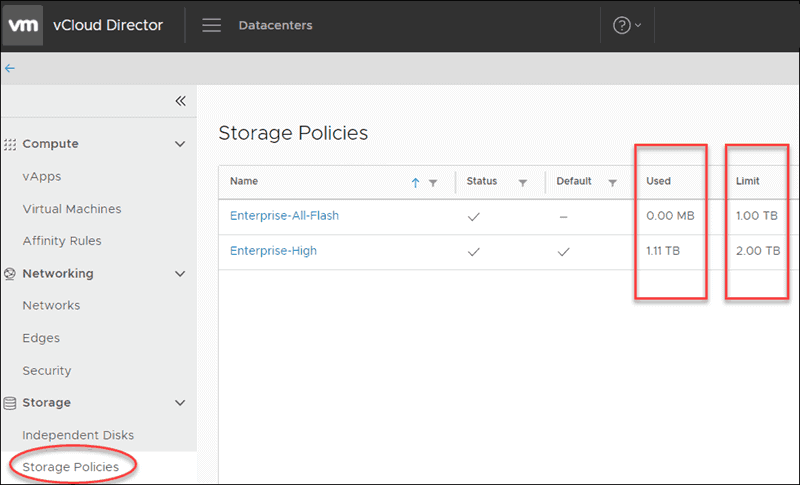
Storage Policies
View how much storage you are consuming compared to how much you have purchased by clicking on Storage Policies in the Storage menu.
Note: For additional documentation on Cloud Connector, refer to our guide Veeam Plugin for VMware Cloud Director.
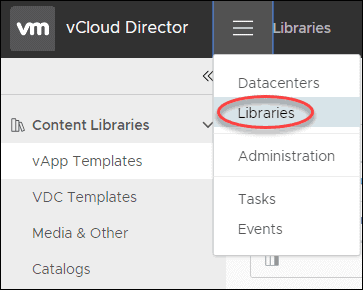
Library Management
Libraries are where installation media and VM templates are stored.
To access Libraries, click the menu icon near the top left-hand side of the screen, and navigate to Libraries:
The default screen shows you vApp Templates. You can click the Add button if you have an OVA or OVF file you wish to upload as a template and follow the on-screen instructions to upload and configure the template.
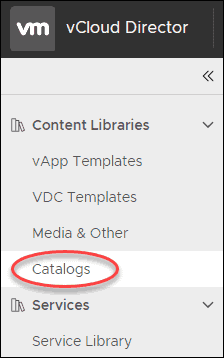
Catalogs
Catalogs are collections of installation media and templates. You can access them by clicking on Catalogs on the menu on the left.
A catalog may be one managed by phoenixNAP and shared among all users, or it can be one that you create with your own installation media and templates. The Public_Shared catalog should already be connected to your organization, which can be used for common installation media.
If you want to upload your own installation media, click New on this screen to create your own catalog. The following screen will prompt you for a name, and an optional description, before allowing you to click OK.
Uploading Installation Media
Once you have created a catalog, click the Media & Other menu item to upload files to it.

Click the Add button at the top of the screen to upload the installation media. Assign a name to the installation media, then select the ISO file you wish to upload:
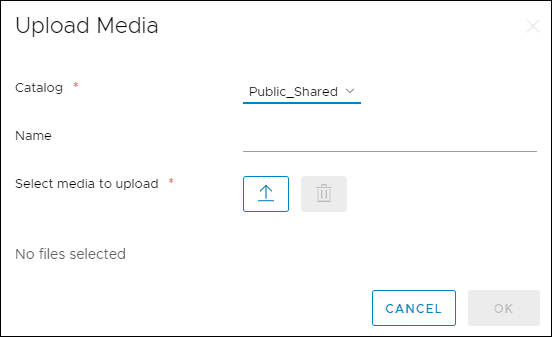
Once the upload is complete, you will be able to use this installation media on VMs in your organization.
PhoenixNAP Data Security Cloud customers who have resources at both Ashburn and Phoenix sites can now utilize the multisite feature of the VMware Cloud Director portal. This single pane of glass approach allows for easier resource management by creating organization associations between the sites. One dedicated organization administrator can quickly perform multisite pairing via the UI.
