Introduction
Private Docker registries are a practical way of distributing resources and sharing Docker images between containers. Setting up a private registry speeds delivery and ensures smooth CI/CD development using the Docker platform.
In this tutorial, learn how to set up and configure a private Docker registry for external accessibility.

Prerequisites
- A system running Ubuntu.
- Command-line access.
- Administrative privileges on the system.
- Docker and Docker Compose installed.
- Nginx installed.
What Is Private Docker Registry
A private Docker registry is a container registry instance installed on a private server and available only to authorized users. It stores images in a centralized location and makes them available to all authenticated Docker hosts.
When set up on a server, a private Docker registry communicates with Docker Hub over the internet. The server pulls and pushes images, stores them locally, and shares them with authorized Docker hosts. The hosts can access the local repository over a secure connection and copy images from the local registry to build containers.
Private vs. Public Docker Registries
Public and private Docker registries have the same underlying technology but different use cases.
Public registries host container images that anyone can download and use. Their open-access nature makes them a good place for developers to share their open-source projects and gain wider exposure. The most popular public Docker registry is Docker Hub, which hosts over five million publicly available images.
Private registries contain proprietary or otherwise sensitive container images not intended for public distribution. By requiring authentication, these registries restrict who can pull and push images, creating a more secure development environment. By running locally, private registries also speed up app development and save bandwidth.
Install and Configure Private Docker Registry
Setting up a server to host a private Docker registry requires running a registry service, configuring an Nginx web server, and generating the necessary security certificates. Follow the steps below to install a private Docker registry on a server.
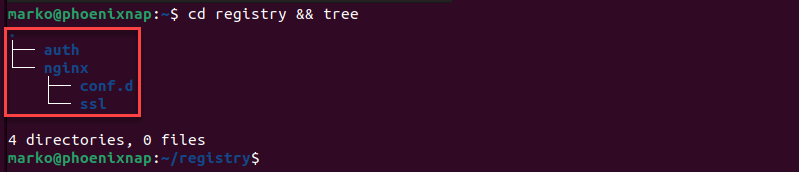
Step 1: Create Registry Directories
Create a new project directory to store all the required configuration files. The following steps show how to create a proper directory structure:
1. Use the following mkdir command to create a new project directory labeled registry and two sub-directories, nginx and auth:
mkdir -p registry/{nginx,auth}2. Create two new directories, conf.d and ssl, inside the nginx directory:
mkdir -p registry/nginx/{conf.d,ssl}3. Go to the registry directory and inspect the directory hierarchy by using the tree command:
cd registry && treeNote: If you do not have the tree tool, install it with sudo apt install tree.
The output shows the final structure of the registry project directory.
Step 2: Create Docker Compose Manifest and Define Services
Create a new compose.yaml manifest for Docker Compose. The manifest defines the Docker Compose version and the services necessary to set up a private registry. The following steps explain how to configure the compose.yaml file:
1. Use a text editor to create a new file in the registry directory. This tutorial uses Nano.
nano compose.yaml2. Paste the following content into the file:
version: '3'
services:
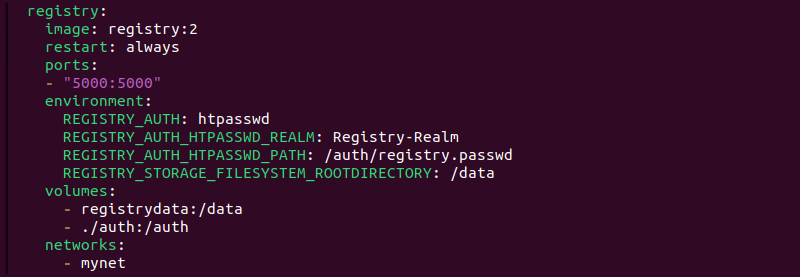
registry:
image: registry:2
restart: always
ports:
- "5000:5000"
environment:
REGISTRY_AUTH: htpasswd
REGISTRY_AUTH_HTPASSWD_REALM: Registry-Realm
REGISTRY_AUTH_HTPASSWD_PATH: /auth/registry.passwd
REGISTRY_STORAGE_FILESYSTEM_ROOTDIRECTORY: /data
volumes:
- registrydata:/data
- ./auth:/auth
networks:
- mynet
nginx:
image: nginx:alpine
container_name: nginx
restart: unless-stopped
tty: true
ports:
- "80:80"
- "443:443"
volumes:
- ./nginx/conf.d/:/etc/nginx/conf.d/
- ./nginx/ssl/:/etc/nginx/ssl/
networks:
- mynet
networks:
mynet:
driver: bridge
volumes:
registrydata:
driver: localThe first service defined in the manifest is the registry service. The service definition includes the following data:
- Since Docker Registry is a container running the registry image, the image is defined as
registry:2. - Adding the
restart: alwaysline ensures the Docker registry service starts when the system boots up. - Setting the ports value to
5000:5000tells Docker that port 5000 inside the running container maps to port 5000 on the host operating system. - The service mounts the docker volume
registrydataand the localauthdirectory, along with theregistry.passwdauthentication file.
The other service runs an Nginx web server. The configuration sets the service to run on ports 80:80 (HTTPS) and 443:443 (HTTPS). It mounts the local directories for virtual configuration (conf.d) and SSL certificates (ssl).

Finally, the manifest defines Docker networks and volumes used by the registry. The mynet network runs with the bridge driver, while the registrydata volume uses the local driver.

3. Save and close the file.
Step 3: Set up Nginx Port Forwarding
Follow the procedure below to configure a Nginx virtual host by defining server parameters in a configuration file.
1. Create a new virtual host file named registry.conf in the nginx/conf.d directory:
nano nginx/conf.d/registry.conf2. Add the following content, replacing [domain] with the registry's domain address, e.g., example.com:
upstream docker-registry {
    server registry:5000;
}

server {
    listen 80;
    server_name registry.[domain];
    return 301 https://registry.[domain]$request_uri;
}

server {
    listen 443 ssl http2;
    server_name registry.[domain];

    ssl_certificate /etc/nginx/ssl/fullchain.pem;
    ssl_certificate_key /etc/nginx/ssl/privkey.pem;

    error_log  /var/log/nginx/error.log;
    access_log /var/log/nginx/access.log;

    location / {
        if ($http_user_agent ~ "^(docker\/1\.(3|4|5(?!\.[0-9]-dev))|Go ).*$" )  {
            return 404;
        }

        proxy_pass                          http://docker-registry;
        proxy_set_header  Host              $http_host;
        proxy_set_header  X-Real-IP         $remote_addr;
        proxy_set_header  X-Forwarded-For   $proxy_add_x_forwarded_for;
        proxy_set_header  X-Forwarded-Proto $scheme;
        proxy_read_timeout                  900;
    }

}
3. Save the file and exit.
The code above defines the following components:
- A connection between Nginx and the registry service via port 5000.
- A server block that listens on port 80 and performs HTTP to HTTPS redirection.
- A server block that listens on port 443 and provides an encrypted connection for the registry. The block is also configured to allow connections only from Docker clients with version 1.6 or later because earlier versions mishandled user agents.
Step 4: Increase Nginx File Upload Size
By default, Nginx limits the file upload size to 1MB. As many Docker images exceed this number, the best practice is to increase the maximum file size on Nginx. To ensure the successful upload of larger images, follow the steps below to increase the limit to 2GB:
1. Create an additional Nginx configuration file by typing:
nano nginx/conf.d/additional.conf2. Add the following line in the file:
client_max_body_size 2G;3. Save and close the file.
Step 5: Configure SSL Certificate and Basic Authentication
Note: If you do not have a certificate yet, check out how to generate an OpenSSL certificate signing request.
Proceed with the below steps to copy the domain's SSL certificates to the ssl directory in the project:
1. Use the cp command to copy the fullchain.pem file:
cp [path-to-file]/fullchain.pem nginx/ssl/2. Copy the privkey.pem file:
cp [path-to-file]/privkey.pem nginx/ssl/3. Go to the auth directory:
cd auth4. request a new password file named registry.passwd for the user:
htpasswd -Bc registry.passwd [username]5. Type in a strong password and re-type it to confirm. The output confirms the success of the operation.

Step 6: Add Root CA Certificate
Add the Root CA certificate to Docker and the host system by following the procedure below:
1. Export the .crt file with OpenSSL by typing:
openssl x509 -in rootCA.pem -inform PEM -out rootCA.crt2. Create a directory for Docker certificates:
mkdir -p /etc/docker/certs.d/registry.[domain]/3. Copy the Root certificate into the directory:
cp rootCA.crt /etc/docker/certs.d/registry.[domain]/4. Create a new directory named extra in the /usr/share/ca-certificates directory:
mkdir -p /usr/share/ca-certificates/extra/5. Copy the same Root certificate into the extra directory:
cp rootCA.crt /usr/share/ca-certificates/extra/6. Reconfigure the newly created ca-certificate package by typing:
dpkg-reconfigure ca-certificates7. Restart the Docker service to apply the changes:
systemctl restart dockerStep 7: Run Docker Registry
With everything set up and ready, build the Docker Registry and Nginx containers using Docker Compose:
1. Execute the docker compose up command with the -d option to deploy the containers in the detached mode.
docker compose up -d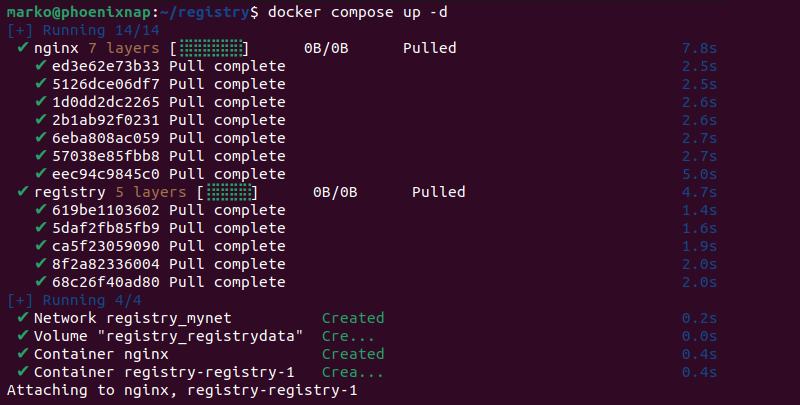
2. Check if the registry and the nginx services are running:
docker compose psThe output should show the services and their assigned ports.
How to Push Docker Image to Private Registry
1. To push an image from a Docker host to the private Docker registry server, log in to the registry with the following command:
docker login https://registry.[domain]/v2/For example, to access the registry at example.com, type:
docker login https://registry.example.com/v2/2. Type in the username and password created in Step 5.

3. Push the image to the private registry with the command:
docker push registry.[domain]/[new-image-name]Pull Image from Docker Hub to Private Registry
1. To locally store an image from Docker Hub to a private registry, use the docker pull command:
docker pull [image]2. Add a tag to the image to label it for the private registry:
docker image tag [image] registry.[domain]/[new-image-name]3. Check whether the Docker image is locally available by prompting the system to list all locally stored images:
docker imagesConclusion
After following this tutorial, you can successfully set up a private Docker registry on Ubuntu, along with an Nginx virtual host and basic authentication. Use it to manage Docker images and build containers on remote Docker hosts.
If you are new to Docker, read How to Manage Docker Containers to learn more about best practices for managing containers with Docker.