Introduction
MongoDB is a NoSQL database that uses a document-oriented approach to simplify the management of large datasets. Horizontal scaling is one of MongoDB's essential features, enabled by the tool's native support for database sharding.
This article will show you how to deploy a sharded MongoDB cluster using Docker and Docker Compose.
Prerequisites
- Docker installed.
- Docker Compose installed.
- MongoDB Client application.
What Is Database Sharding?
Database sharding is a method of distributing large datasets across multiple servers called shards. Shards are often deployed as replica sets stored on multiple machines for high availability.
When a dataset is sharded, it is divided into smaller subsets based on criteria such as user ID, location, or date. Since each data subset resides on a separate server, the system determines which shard contains the relevant data and directs queries accordingly.
Sharding in MongoDB
Sharding leverages MongoDB's flexible document model to distribute data across shards. Additionally, allows MongoDB to support high throughput operations on large datasets.
By distributing data based on a shard key (e.g., a user ID or location), MongoDB ensures that queries are directed to the appropriate shard, maximizing throughput and minimizing latency. Features like automatic sharding and intelligent data balancing allow users to scale their apps seamlessly and efficiently.
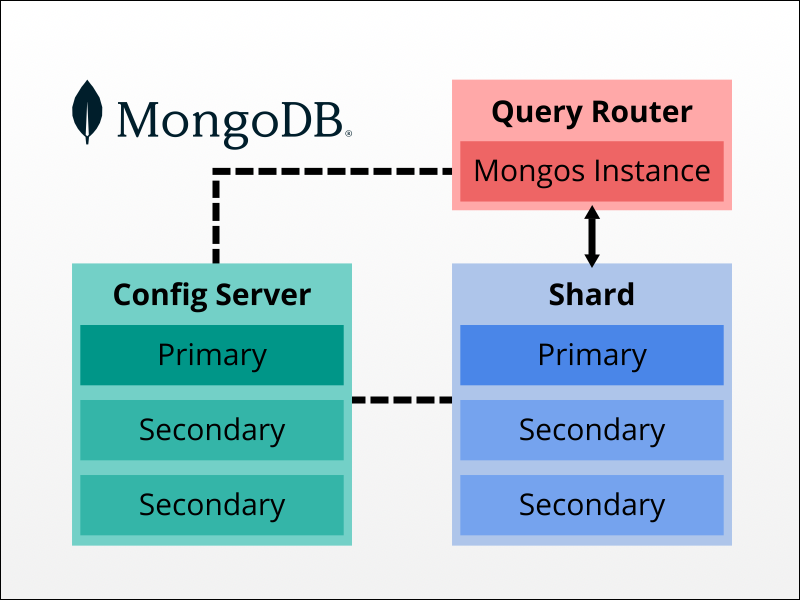
Sharded Cluster Architecture and Components
Each sharded cluster in MongoDB consists of the following components:
- Config servers. Servers that store cluster configuration and metadata. One of the servers acts as the primary server, and others are secondary.
- Shards. Cluster members that contain data subsets. One shard is primary, while others are secondary.
- Query router. The system that enables client applications to interact with the cluster.
The diagram below illustrates the architecture of a sharded MongoDB cluster.
Benefits of Sharding in MongoDB
Sharding brings the following benefits to MongoDB users:
- Improved querying speed. The database management system needs to access only the relevant shard, limiting the amount of data it needs to process.
- Easier horizontal scaling. More servers can be added whenever necessary to handle growing data volumes and user traffic.
- Better availability. If one shard fails, the system continues to operate as other shards remain accessible.
When to Set up MongoDB Sharding
Consider setting up MongoDB Sharding in the following scenarios:
- Rapidly growing data volume. As a dataset expands, querying a single server can become inefficient and slow.
- High write loads. Sharding distributes write operations across multiple servers and prevents the bottleneck effect.
- The need for high availability. Other shards remain available if a cluster member fails.
- Anticipated growth. Sharding facilitates dealing with growing data storage needs and increased user traffic.
- Unsatisfactory read performance. Sharding significantly improves read performance, especially for geographically distributed applications.
Note: Sharding can increase operational overhead. There is also a potential for data skew, i.e., uneven data distribution across shards that can negatively impact performance.
How to Set Up Sharding in MongoDB
To deploy a fully functional MongoDB sharded cluster, deploy each cluster element separately. Below are the steps for sharded cluster deployment using Docker containers and Docker Compose.
Note: The tutorial uses a single test machine to deploy all cluster elements. While it is possible to implement sharding in this way, MongoDB recommends using a separate machine for each member of each deployed replica set in a production environment.
Step 1: Deploy Config Server Replica Set
Start by deploying a replica set of config servers to store configuration settings and cluster metadata. Proceed with the steps below to create config servers:
1. Create a directory using the mkdir command and navigate to it using the cd command:
mkdir config && cd config2. Use a text editor to create a file called compose.yml:
nano compose.yml3. Write the configuration you want to deploy. The example below defines three config server replicas in the services section and three Docker volumes for persistent data storage in the volumes section:
services:

  configs1:
    container_name: configs1
    image: mongo
    command: mongod --configsvr --replSet cfgrs --port 27017 --dbpath /data/db
    ports:
      - 10001:27017
    volumes:
      - configs1:/data/db

  configs2:
    container_name: configs2
    image: mongo
    command: mongod --configsvr --replSet cfgrs --port 27017 --dbpath /data/db
    ports:
      - 10002:27017
    volumes:
      - configs2:/data/db

  configs3:
    container_name: configs3
    image: mongo
    command: mongod --configsvr --replSet cfgrs --port 27017 --dbpath /data/db
    ports:
      - 10003:27017
    volumes:
      - configs3:/data/db

volumes:
  configs1: {}
  configs2: {}
  configs3: {}
Each config server replica requires the following parameters:
- Name. Choose any name you want. Numbered names are recommended for easier instance management.
- Name of the Docker container. Choose any name.
- Docker image. Use the
mongoimage available on Docker Hub. mongodcommand. The command specifies the instance is a config server (--configsvr) and part of a replica set (--replSet). Furthermore, it defines the default port (27017) and the path to the database.- Ports. Map the default Docker port to an external port of your choosing.
- Volumes. Define the database path on a permanent storage volume.
Note: Learn about the differences between Docker images and containers.
4. Save and exit the file when you finish.
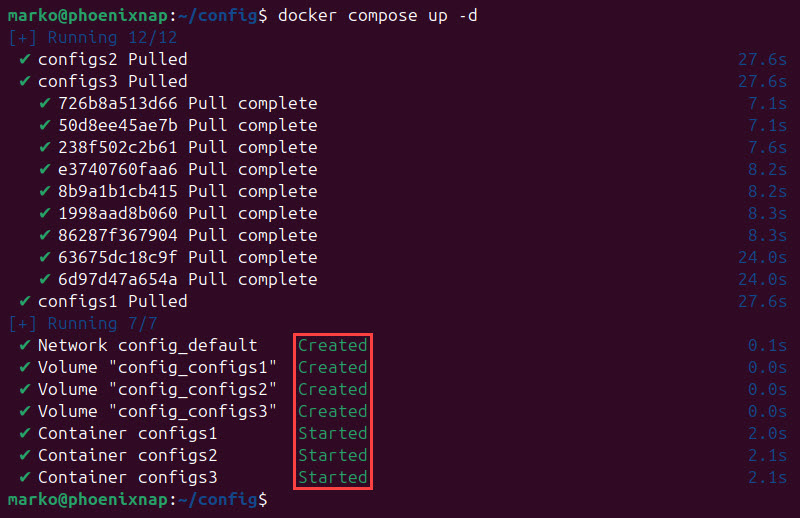
5. Apply the configuration with the docker compose command:
docker compose up -dThe system confirms the successful deployment of the MongoDB config servers.
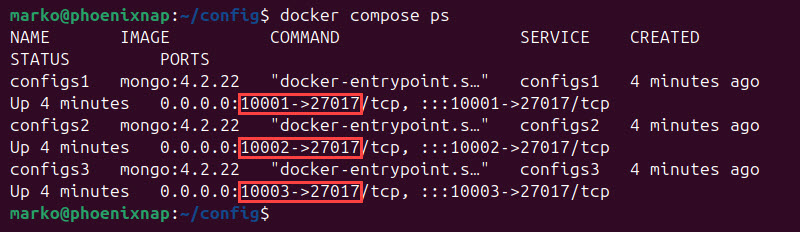
6. Use the docker compose command to list only the containers relevant to the deployment:
docker compose psAll three config server replicas show as separate containers with different external ports.
7. Check the Docker volumes:
docker volume ls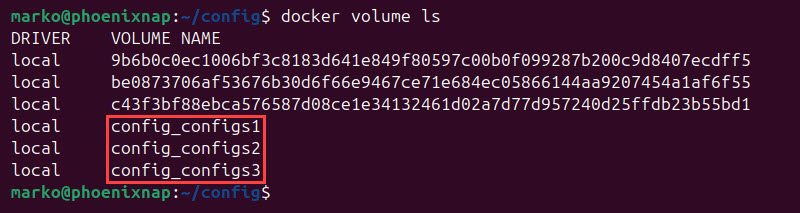
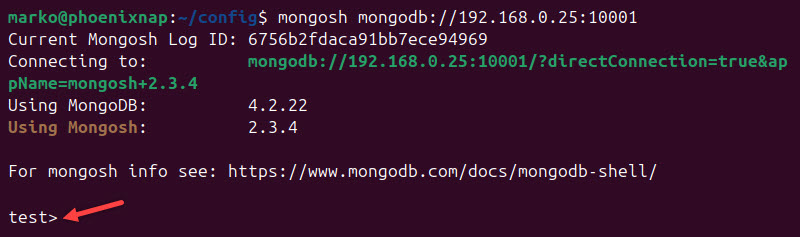
8. Use the Mongo client application to log in to one of the config server replicas:
mongosh mongodb://[ip_address]:[port]As a result, the MongoDB shell command prompt appears:
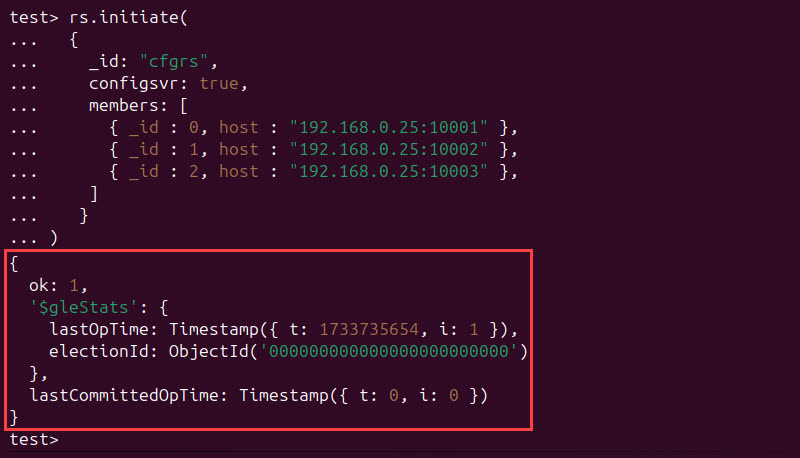
9. Initiate the replicas in MongoDB by using the rs.initiate() method. The configsvr field set to true is required for config server initiation:
rs.initiate(
  {
    _id: "cfgrs",
    configsvr: true,
    members: [
      { _id : 0, host : "[ip_address]:[port]" },
      { _id : 1, host : "[ip_address]:[port]" },
      { _id : 2, host : "[ip_address]:[port]" }
    ]
  }
)
If the operation is successful, the "ok" value in the output is 1. Conversely, if an error occurs, the value is 0, and an error message is displayed.
Press Enter to exit the secondary and return to the primary instance.
10. Use the rs.status() method to check the status of your instances:
rs.status()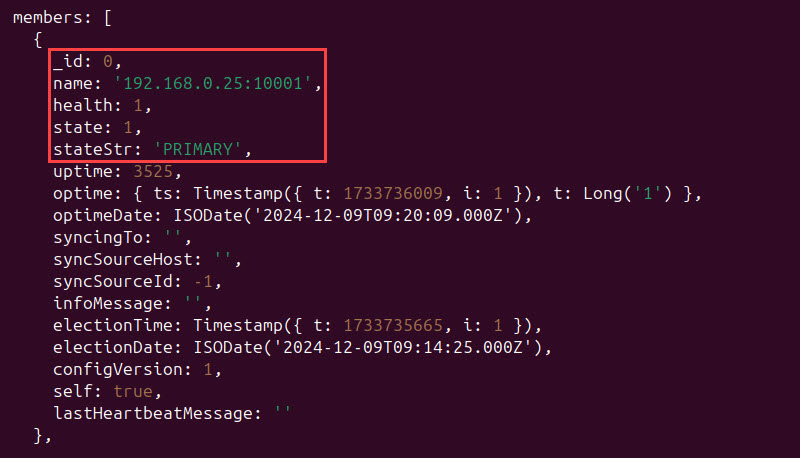
11. Exit the MongoDB shell by entering:
.exitStep 2: Create Shard Replica Sets
After setting up a config server replica set, create data shards. The example below shows how to create and initiate a single shard replica set, but the process for each subsequent shard is the same:
1. Create and navigate to the directory where you will store shard-related manifests:
mkdir shard && cd shard2. Create a compose.yml file with a text editor:
nano compose.yml3. Configure shard instances. Below is an example of a compose.yml that defines three shard replica sets and three permanent storage volumes:
services:

  shard1s1:
    container_name: shard1s1
    image: mongo
    command: mongod --shardsvr --replSet shard1rs --port 27017 --dbpath /data/db
    ports:
      - 20001:27017
    volumes:
      - shard1s1:/data/db

  shard1s2:
    container_name: shard1s2
    image: mongo
    command: mongod --shardsvr --replSet shard1rs --port 27017 --dbpath /data/db
    ports:
      - 20002:27017
    volumes:
      - shard1s2:/data/db

  shard1s3:
    container_name: shard1s3
    image: mongo
    command: mongod --shardsvr --replSet shard1rs --port 27017 --dbpath /data/db
    ports:
      - 20003:27017
    volumes:
      - shard1s3:/data/db

volumes:
  shard1s1: {}
  shard1s2: {}
  shard1s3: {}
The YAML file for the shard replica set contains specifications similar to the config server specifications. The main difference is in the command field for each replica, where the mongod command for shards is issued with the --shardsvr option. As a result, MongoDB recognizes the servers as shard instances.
4. Save and exit the file.
5. Use Docker Compose to apply the replica set configuration:
docker compose up -dThe output confirms the successful creation of the Docker containers.
6. Log in to one of the replicas using the mongo command:
mongosh mongodb://[ip_address]:[port]7. Initiate the replica set with rs.initiate():
rs.initiate(
  {
    _id: "shard1rs",
    members: [
      { _id : 0, host : "10.0.2.15:20001" },
      { _id : 1, host : "10.0.2.15:20002" },
      { _id : 2, host : "10.0.2.15:20003" }
    ]
  }
)
If the initiation is successful, the output value of "ok" is 1.

Note: Replica set names must be unique for each shard replica set you add to the cluster.
Step 3: Start mongos Instance
A mongos instance acts as a query router, i.e., an interface between the cluster and client apps. Follow the steps below to set it up in your cluster.
1. Create a directory for your mongos configuration and navigate to it:
mkdir mongos && cd mongos2. Create a Docker Compose file:
nano compose.yml3. Configure the mongos instance. For example, the file below creates a mongos instance and exposes it to port 30000. The command section should contain the --configdb option, followed by references to the addresses of config server replicas, as in the example below:
services:

  mongos:
    container_name: mongos
    image: mongo
    command: mongos --configdb cfgrs/10.0.2.15:10001,10.0.2.15:10002,10.0.2.15:10003 --bind_ip 0.0.0.0 --port 27017
    ports:
      - 30000:27017
4. Save the file and exit.
5. Apply the configuration with docker compose:
docker compose up -dThe output shows Docker has created the mongos instance container.
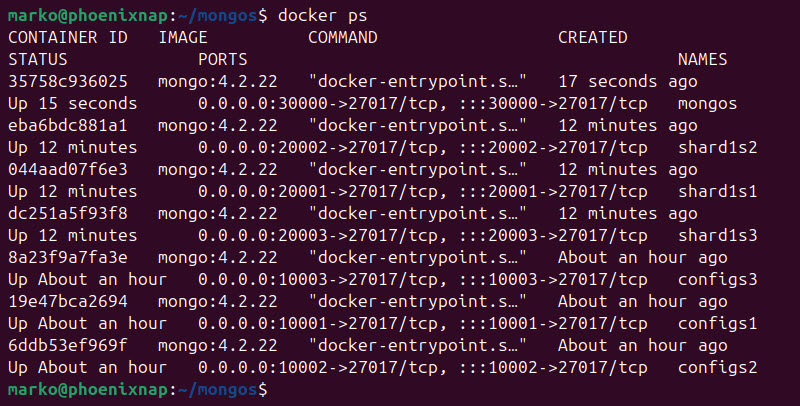
6. Check the running containers in Docker:
docker psAfter deploying three config server replicas, three shard replicas, and one mongos instance, the output shows seven containers based on the mongo image.
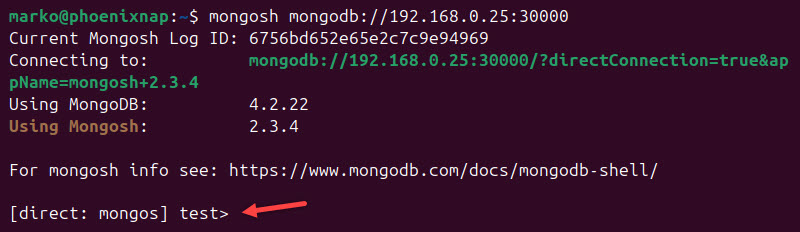
Step 4: Connect to Sharded Cluster
With all the instances up and running, the rest of the cluster configuration is performed inside the cluster. Connect to the cluster using the mongosh command:
mongosh mongodb://[mongos_ip_address]:[mongos_port]The MongoDB shell command prompt appears.
Step 5: Add Shards to Cluster
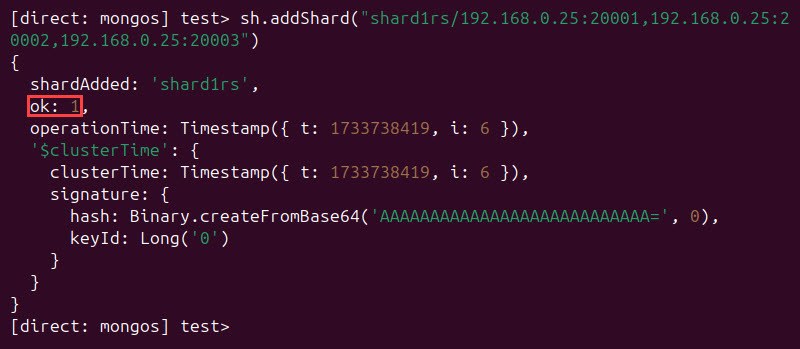
Use the sh.addshard() method and connect the shard replicas to the cluster:
sh.addShard("[shard_replica_set_name]/[shard_replica_1_ip]:[port],[shard_replica_2_ip]:[port],[shard_replica_3_ip]:[port]")The output shows that the system successfully added the shards to the cluster. The "ok" value is 1:
Check the status with the sh.status() method:
sh.status()The output lists the active shards in the shards section:

Step 6: Enable Sharding for Database
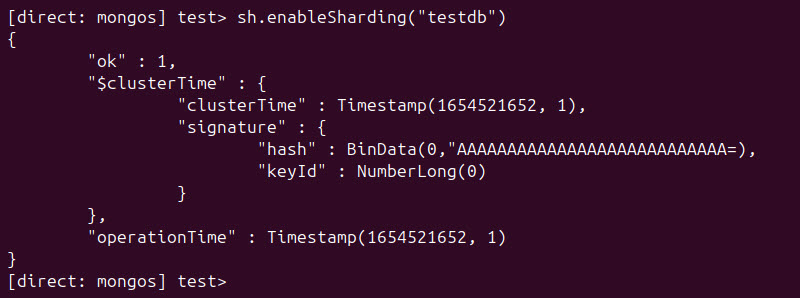
Enable sharding for each included database. Use the sh.enableSharding() method followed by the database name.
sh.enableSharding("[database_name]")The example below enables sharding for the database named testdb:
Note: Database workloads require high memory density and large storage capacity to perform well. Our BMC database servers are workload-optimized and support all major databases.
Step 7: Shard Collection
There are two ways to shard a collection in MongoDB. Both ways use the sh.shardCollection() method:
- Range-based sharding produces a shard key using multiple fields and creates contiguous data ranges based on the shard key values.
- Hashed sharding forms a shard key using a single field's hashed index.
To shard a collection using range-based sharding, specify the field to use as a shard key and set its value to 1:
sh.shardCollection("[database].[collection]", { [field]: 1 } )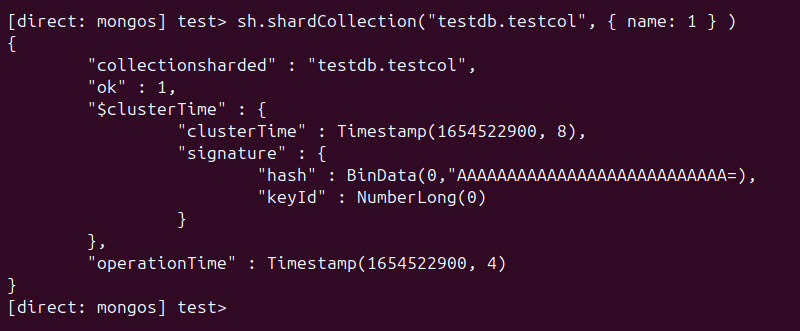
Use the same syntax to set up hashed sharding. This time, set the value of the field to "hashed":
sh.shardCollection("[database].[collection]", { [field]: "hashed" } )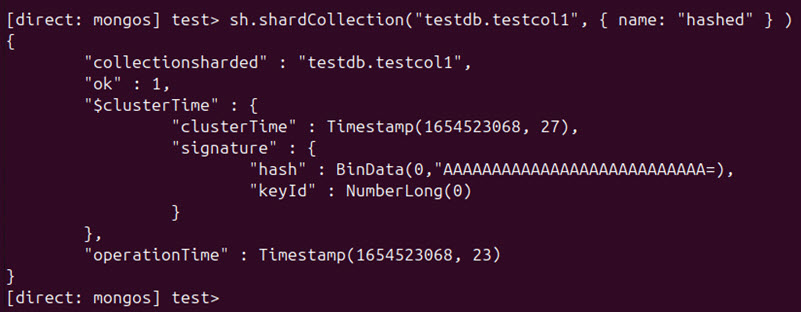
Warning: Once you shard a collection, you cannot unshard it.
MongoDB Sharding: Best Practices
Follow the best practices listed below to ensure an effective implementation and management of MongoDB clusters:
- Maximize shard key selectiveness. The shard key should effectively and evenly distribute data across shards.
- Pay attention to data access patterns. Minimize data movement and improve query performance by choosing a shard key that aligns with the app's data querying patterns.
- Monitor data distribution. Identify and address potential data skews early by regularly monitoring data distribution across shards.
- Use range-based queries. Leverage range-based queries on the shard key to efficiently retrieve data from specific shards.
- Regularly review and update security configurations. Implement appropriate security measures, such as authentication and authorization. Keep your sharded cluster secure by regularly reviewing and updating security configurations.
- Simulate production workloads. Identify and address potential performance bottlenecks by performing production workload simulations.
Conclusion
After reading this tutorial, you can deploy a sharded MongoDB cluster using Docker and Docker Compose. The article also introduced sharding as a database management technique and provided some best practice tips.
If you are interested in how MongoDB compares against popular database management solutions, read MongoDB vs. MySQL and Cassandra vs. MongoDB.