Introduction
MongoDB is a document database useful for storing complex data and modifying documents without affecting existing data structures. Its non-relational (NoSQL) nature makes it a popular choice for web development, as it provides high performance, high availability, and automatic horizontal scaling.
This guide will show you how to install MongoDB on Ubuntu.
Prerequisites
- A system running Ubuntu.
- Command-line access.
- A user account on Ubuntu with sudo privileges.
- The curl command installed.
Install MongoDB on Ubuntu
The best way to install MongoDB on Ubuntu is via the official MongoDB repository. Proceed with the steps below to add the repository to the system, install the necessary packages, and start MongoDB.
Step 1: Add MongoDB Repository
The following section explains how to add the repository containing MongoDB installation packages. Complete this step by opening a terminal emulator and executing the following commands:
1. Import the public key to the Ubuntu server:
curl -fsSL https://www.mongodb.org/static/pgp/server-7.0.asc | \
   sudo gpg -o /usr/share/keyrings/mongodb-server-7.0.gpg \
   --dearmor
2. Create a list file and add the MongoDB repository to the system's sources list.
On Ubuntu 22.04, type the following command:
echo "deb [ arch=amd64,arm64 signed-by=/usr/share/keyrings/mongodb-server-7.0.gpg ] https://repo.mongodb.org/apt/ubuntu jammy/mongodb-org/7.0 multiverse" | sudo tee /etc/apt/sources.list.d/mongodb-org-7.0.listOn Ubuntu 20.04, replace the jammy reference with focal:
echo "deb [ arch=amd64,arm64 signed-by=/usr/share/keyrings/mongodb-server-7.0.gpg ] https://repo.mongodb.org/apt/ubuntu focal/mongodb-org/7.0 multiverse" | sudo tee /etc/apt/sources.list.d/mongodb-org-7.0.list3. Refresh the local package database:
sudo apt updateThe APT output shows the newly added MongoDB repository.

Step 2: Install MongoDB
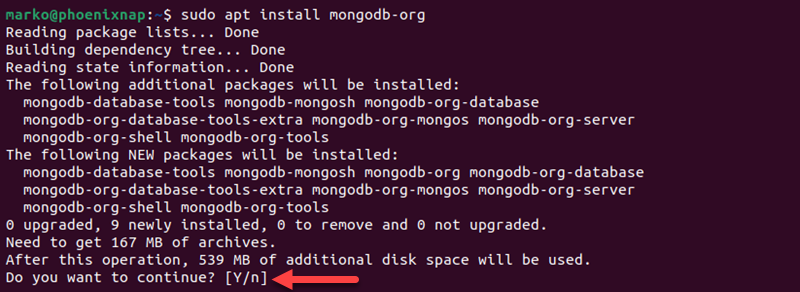
Once the MongoDB repository is registered on the system, execute the command below to install MongoDB using APT:
sudo apt install mongodb-orgWhen prompted, type Y and press Enter.
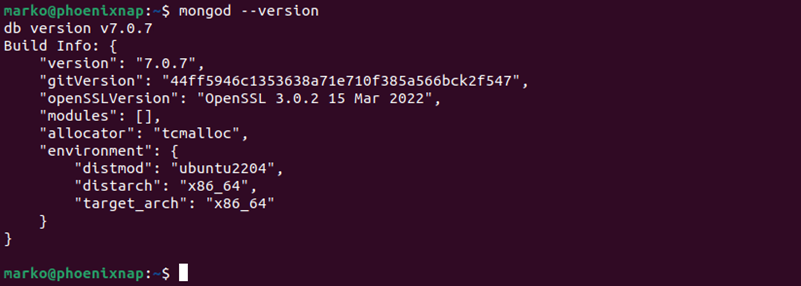
Confirm the success of the installation by checking the MongoDB version:
mongod --versionThe output shows basic information about the installation:
Step 3 (Optional): Lock MongoDB Version
By default, APT downloads and installs updates as they are released. To prevent unintended upgrades of the MongoDB installation, lock the installed version by executing the following commands:
echo "mongodb-org hold" | sudo dpkg --set-selectionsecho "mongodb-org-server hold" | sudo dpkg --set-selectionsecho "mongodb-org-shell hold" | sudo dpkg --set-selectionsecho "mongodb-org-mongos hold" | sudo dpkg --set-selectionsecho "mongodb-org-tools hold" | sudo dpkg --set-selectionsThe commands show no output.
Step 4: Start MongoDB
With MongoDB installed on the system, use the steps below to start a database shell prompt:
1. Start the MongoDB service with the following systemctl command:
sudo systemctl start mongod2. To enable launching the service at system startup, enter:
sudo systemctl enable mongod
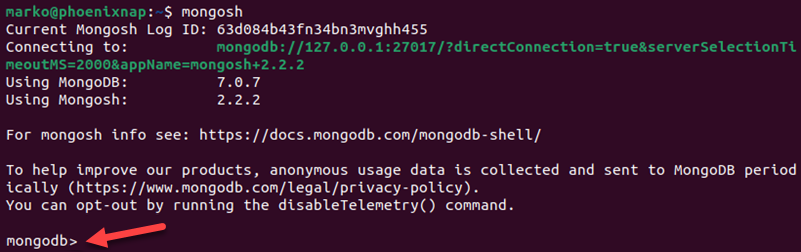
3. Start mongosh (the MongoDB shell) by typing:
mongoshThe shell prompt appears alongside basic information about the MongoDB instance.
4. Exit the Mongo shell by pressing Ctrl-C. Alternatively, enter the following command:
quit()Configure Firewall for MongoDB
Note: The following section pertains to users who want to connect remotely to a MongoDB instance. You can skip this section if you plan to install and use MongoDB on the same system.
The recommended way to set up remote connections to a MongoDB instance is to grant access to specific IP addresses only. Proceed with the steps below to set up the system to accept connections from a remote client:
1. MongoDB uses port 27017 to communicate. Create a firewall rule that exposes that port to a specific IP address. The example below shows how to create the rule in Ubuntu's default ufw firewall:
sudo ufw allow from [remote-ip-address]/32 to any port 27017Replace [remote-ip-address] with the actual IP address of a remote system.
2. Open the mongod configuration file in a text editor such as Nano:
sudo nano /etc/mongod.conf3. Find the entry labeled bind_ip, insert a comma, and add the IP address of your remote system:
bind_ip = 127.0.0.1, [remote-ip-address]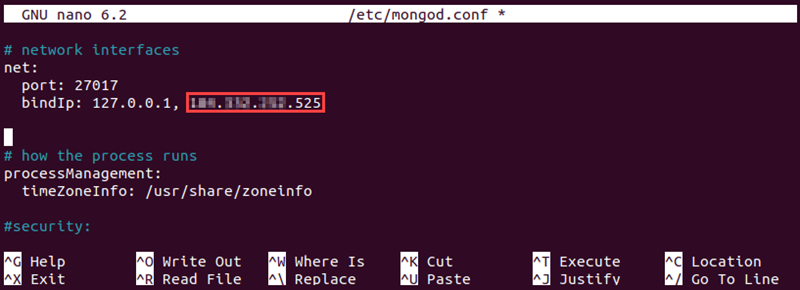
Save the file and exit.
4. Restart the MongoDB service:
sudo systemctl restart mongodSetting up MongoDB Authentication
MongoDB comes with authentication turned off by default. The following section explains how to secure it by turning on authentication and creating a root user and password.
1. Start a MongoDB shell:
mongosh2. Switch to the admin database:
use admin3. Create a root user by entering the following command:
db.createUser({user:"root", pwd:"[password]", roles:[{role:"root", db:"admin"}]})Replace [password] with a complex and secure password of your choosing.
4. Exit the Mongo shell by pressing Ctrl+C.
5. Open the mongod.service file in a text editor:
sudo nano /lib/systemd/system/mongod.service6. Find the ExecStart entry in the Service section and add the --auth flag immediately after /usr/bin/mongod:
ExecStart=/usr/bin/mongod --auth --config /etc/mongod.conf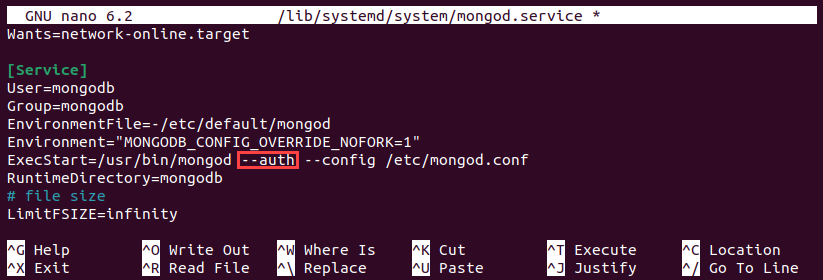
Save the file and exit.
7. Reload the system:
sudo systemctl daemon-reload8. Restart the MongoDB service:
sudo systemctl restart mongod9. Enter the following command to authenticate the user account:
mongo –u "root" –p ––authenticationDatabase "admin"10. When prompted, type the password you set above. The mongosh shell prompt appears.
Conclusion
After following this tutorial, you should know how to install MongoDB on your Ubuntu server. The article also showed how to enable secure remote access and set up additional user authentication.
If you are starting to learn about MongoDB, read how to create a MongoDB database.