Introduction
Container deployment and Kubernetes orchestration are immensely powerful when deployed in virtual environments. The flexibility and scaling capabilities offer endless opportunities.
Why then add a single-tenant physical server to the cluster? VMs are known to create latency issues for specific applications. Direct hardware access can be a solution to this problem, especially with the option of adding hardware accelerators (GPUs).
Developments in Machine Learning and AI are steering organizations towards implementing Kubernetes clusters across both VMs and Bare Metal Servers.
This tutorial shows you how to implement the concepts discussed in our previous article on Kubernetes Architecture.
Follow the outlined steps and learn how to install Kubernetes on a Bare Metal Server.
Prerequisites
- Multiple Linux servers
- A user account on every system with sudo or root privileges
- Access to the command line/terminal window
- The apt package manager (Debian 10)
Note: To avoid complex Kubernetes deployments, phoenixNAP Bare Metal Cloud features one-click deployments on Bare Metal powered by Rancher. Simplify Kubernetes deployment and cluster management - to find out more, read Rancher BMC Integration for Kubernetes Cluster Management.
Prepare Bare Metal Server for Kubernetes Installation
Kubernetes is a highly automated orchestration tool. It communicates between nodes and takes steps to replicate pods whenever the current state of the clusters does not match the desired state.
To facilitate this process, communication between nodes needs to be unfettered. Each node needs to be configured, so that standard security settings do not interfere with communication lines.
The settings differ depending on the distribution and they need to be applied to every node within a cluster. In this example, the installation is conducted using Debian 10.
If you are using another distribution, visit our tutorial on how to install Kubernetes on a CentOS 7 or Ubuntu 18.04 system.
Note: A node within a cluster should have a host-name assigned to them. Identifying nodes quickly and precisely is critical to future operations on the cluster.
Step 1: Disable SWAP
Kubernetes pods are designed to utilize CPU limits fully. The kubelet is not designed to use SWAP memory and it, therefore, needs to be disabled. Enter the following command in your terminal window to disable SWAP:
sudo swapoff -aStep 2: Resolve nftables Backend Compatibility Issue
The current kubeadm packages are not compatible with the nftables backend. To avoid any issues, switch the iptables tooling to their legacy mode:
sudo update-alternatives --set iptables /usr/sbin/iptables-legacy
sudo update-alternatives --set ip6tables /usr/sbin/ip6tables-legacy
sudo update-alternatives --set arptables /usr/sbin/arptables-legacy
sudo update-alternatives --set ebtables /usr/sbin/ebtables-legacy
Step 3: Configure Firewall
Firewall settings need to be modified to allow communication among pods within a cluster. In this example, we edited the ports by using ufw.
Note: UFW is not available in Debian by default. Ensure that it is installed and enabled on your system.
To do so, type the following commands on your Master Node:
sudo ufw allow 6443/tcp
sudo ufw allow 2379/tcp
sudo ufw allow 2380/tcp
sudo ufw allow 10250/tcp
sudo ufw allow 10251/tcp
sudo ufw allow 10252/tcp
sudo ufw allow 10255/tcp
sudo ufw reload
Additionally, these ports need to be open on each Worker Node:
sudo ufw allow 10251/tcp
sudo ufw allow 10255/tcp
sudo ufw reload
Step 4: Install Docker
A container runtime software manages container images on nodes. Without it, Kubernetes cannot access image libraries and execute the applications within the containers. For this purpose, we are going to install Docker.
Install Docker on all the Master and Worker Nodes participating in your cluster. That means you need to repeat this process on each node in turn.
Note: Hardware devices have unique addresses, although some virtual machines may have identical values. Kubernetes uses these values to identify nodes in the cluster. If these values are not unique to each node, the installation process may fail.
Access your command-line interface. The following command updates Debian repositories and installs packages. It also allows your system to use repositories over a secure protocol, HTTPS:
sudo apt-get update && apt-get install apt-transport-https ca-certificates curl software-properties-commonNow retrieve and add Docker’s official GPG key by typing:
curl -fsSL https://download.docker.com/linux/ubuntu/gpg | sudo apt-key add –The output confirms that the action has been completed.

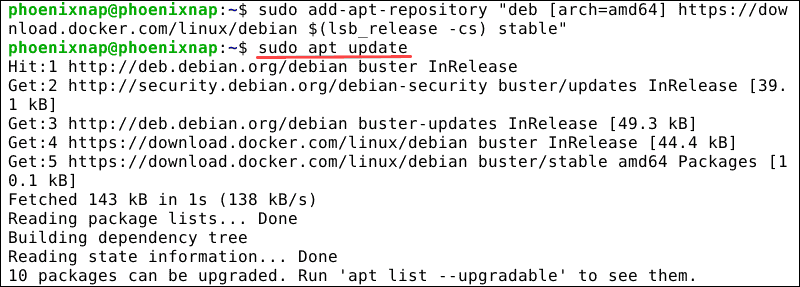
We have added the GPG key and can now proceed to add Docker’s apt repository:
sudo add-apt-repository \ "deb [arch=amd64] https://download.docker.com/linux/ubuntu \
$(lsb_release -cs) \
stable"
Do not forget to update your repositories:
sudo apt-get updateThe system is now ready for the Docker CE installation.
Install Docker using the following command:
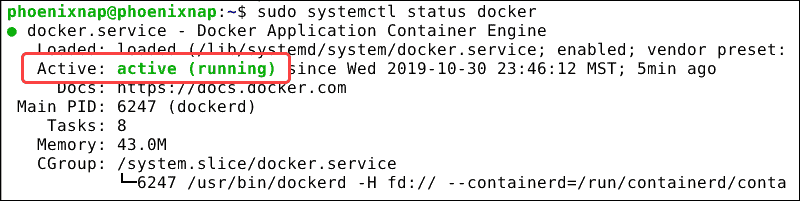
sudo apt-get install docker-ceCheck if the service is active with:
docker -vThe command line confirms that the service is active.
See if the service is working properly by calling on an image:
sudo docker run hello-worldYou have now received confirmation that Docker works properly.

Step 5: Change the cgroup-driver
Make sure that both docker-ce and Kubernetes are using the same ‘cgroup’.
Check the current docker cgroup:
sudo docker info | grep -i cgroupThe result below confirms that Docker is using ‘cgroupfs’ as a cgroup-driver.

Change the Kubernetes cgroup-driver to ‘cgroupfs’ if necessary by typing:
cat > /etc/docker/daemon.json <<EOF
{
"exec-opts": ["native.cgroupdriver=systemd"],
"log-driver": "json-file",
"log-opts": {
"max-size": "100m"
},
"storage-driver": "overlay2"
}
EOF
Reload the systemd system and restart the kubelet service.
systemctl daemon-reloadsystemctl restart kubeletWe have selected and installed a container runtime software, in this case, Docker. The next section explains how to install Kubernetes and the tools we need to manage Kubernetes.
Install Kubernetes on Bare Metal Server
Step 1: Download Kubernetes Repositories
Download Kubernetes and add a signing key to ensure that the software is authentic:
curl -s https://packages.cloud.google.com/apt/doc/apt-key.gpg | sudo apt-key add –We receive confirmation that the package is available.

Kubernetes is not in the default repositories. To add them, enter the following command on each node in the cluster:
sudo apt-add-repository "deb http://apt.kubernetes.io/ kubernetes-xenial main"Step 2: Install kubelet, kubeadm and kubectl
To be able to administer Kubernetes, we need to install kubectl, a utility used to issue commands to the cluster. We also need to install kubelet as it is essential for deploying and controlling pods within a cluster. Kubeadm is the program that initializes Kubernetes during startup. To install these 3 essential tools, enter the following commands:
sudo apt-get update
sudo apt-get install -y kubelet kubeadm kubectl
sudo apt-mark hold kubelet kubeadm kubectl
The kubelet is now restarting every few seconds, as it waits in a crash loop for kubeadm to tell it what to do.

Step 3: Initialize Kubernetes on Master Node
Enter the following command on the master node:
sudo kubeadm init --pod-network-cidr=10.244.0.0/16It might take several minutes until the output confirms that the cluster is active:
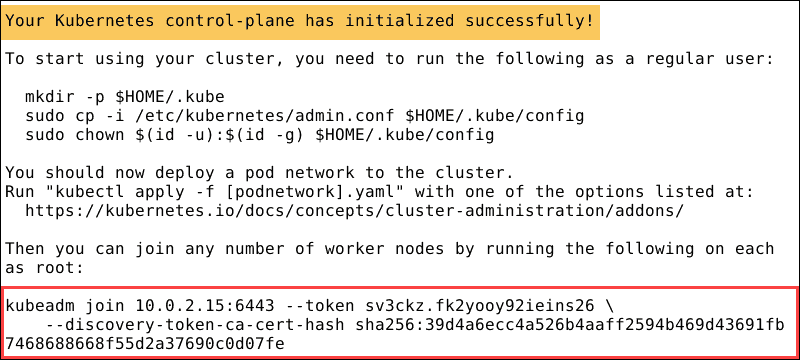
Once the system completes the action, it displays a kubeadm join message. Make a note of the whole entry. You are going to need it to join the worker nodes to the cluster.
Step 4: Create a Directory for the Kubernetes Cluster
Make kubectl work for your non-root user, by running these commands, which are also part of the kubeadm init output:
mkdir -p $HOME/.kube
sudo cp -i /etc/kubernetes/admin.conf $HOME/.kube/config
sudo chown $(id -u):$(id -g) $HOME/.kube/config
Step 5: Pod Network Add-On (Flannel)
Install a pod network add-on so that your pods can communicate effectively. Flannel is an overlay network that is compatible with Kubernetes. To install Flannel type:
kubectl apply -f https://raw.githubusercontent.com/coreos/flannel/master/Documentation/kube-flannel.ymlNote: If one of the pods in your container is reporting an error, you can restart them. Read our guide on How To Restart Kubernetes Pods.
Step 6: Join Worker Node to Cluster
Enter the kubeadm join command on each worker node. The key you noted from Step 3, connects each node to the cluster:
kubeadm join 10.0.2.15:6443 –token sv3ckz.fk2yooy92ieins26  \
--discovery-token-ca-cert-hash sha256:39d4a6ecc4a526b4aaff2594b469d43691fb7468688668f55d2a37690codo7fe
Wait a few minutes and check the status of the nodes.
Switch to the master server, and enter:
kubectl get nodesThe system then displays the worker nodes that you joined to the cluster.
Conclusion
Installing Kubernetes on a single-tenant physical server is an unorthodox solution. But one with surprising benefits. It testifies to the versatile nature of container technology and the possibilities it offers. By following these steps, you should have successfully installed Kubernetes on your Bare Metal Server.
Next, we shall explore container optimization and learn how to run applications on the platform efficiently.