Introduction
An SSH (Secure Shell) connection is essential for effectively managing a remote server. SSH keys, which consist of a public-private key pair, facilitate encrypted communication and serve as access credentials to establish a secure connection.
Learn how to generate SSH keys on Ubuntu and set up key-based authentication to connect to a remote server without a password.

Prerequisites
- A user account with sudo privileges.
- Access to a terminal window/command line.
- A remote Ubuntu server with network access.
- SSH enabled on remote Ubuntu server.
Note: For more information about what SSH is, how it works, and why it is used, refer to our guide How Does SSH Work.
How to Generate and Set Up SSH Keys on Ubuntu
The SSH key generation process creates two keys:
- Public key. Installed on the server, allows the server to recognize and authenticate the client based on the matching private key.
- Private key. Must be kept secure. It is crucial for the authentication process to ensure that you are the only person who can authenticate to the server.
Follow the steps below to create the public-private key pair.
Generate SSH Key Pair
Generate a pair of SSH keys on the client system. The client system is the machine that connects to the SSH server.
1. Create a directory named .ssh in the home directory. The -p option ensures the system does not return an error if the directory exists:
mkdir -p $HOME/.ssh2. Change permissions of the directory to give the user read, write, and execute privileges:
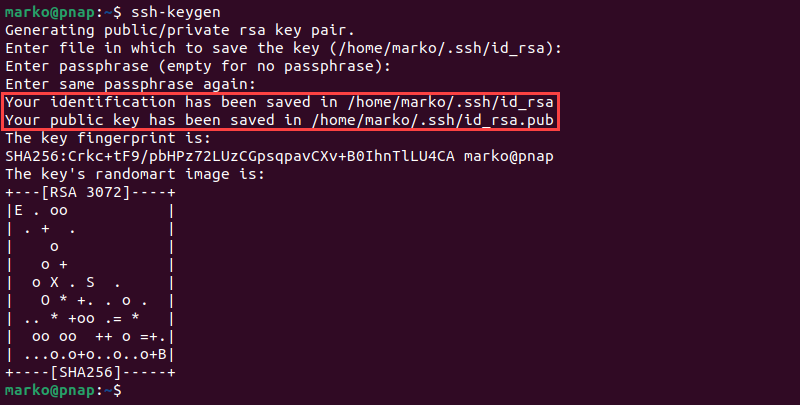
chmod 0700 $HOME/.ssh3. Execute the ssh-keygen command to create an RSA key pair:
ssh-keygen4. When prompted, provide the path to the key file. If you press Enter without typing a file path, the key will be stored in the .ssh directory under the default file name id_rsa.
5. The system asks you to create a passphrase as an added layer of security. Input a memorable passphrase, and press Enter.
The output shows that the keys have been created successfully.
Alternatively, create keys using the RSA 4096 encryption for extra security:
ssh-keygen -t rsa -b 4096Note: If a key pair with the same name exists, new keys will overwrite the information in the file, and the old keys will no longer work.
Copy Public Key to Ubuntu Server
After obtaining the key pair, copy the public key to the remote Ubuntu server using one of the following methods.
Using ssh-copy-id Script
The ssh-copy-id script is designed to automatically:
- Log into the remote server via SSH.
- Create the .ssh directory and authorized_keys file on the remote server and set the correct permissions.
- Append the key to the authorized_keys file.
Note: To use the ssh-copy-id tool, you need the remote server's IP address. Learn how to find IP addresses in Linux systems.
1. Use the ssh-copy-id command on the client system to copy the key to the remote Ubuntu server. Enter the -i option to specify the path to the SSH key:
ssh-copy-id -i [ssh-key-location] [username]@[server-ip-address]Replace [ssh-key-location] with the path to your public SSH key, [username] with the remote server's username and [server-ip-address] with the remote server's IP.
Note: The default SSH key path is ~/.ssh/id_rsa.pub. If your public key is located elsewhere or named differently, change the path accordingly.
2. A message stating that the authenticity of the host cannot be established may appear when connecting to the server for the first time. Type yes and press Enter to proceed.
3. When prompted, enter the password for the user account on the server to authorize copying the SSH public key.

The system copies the contents of the ~/.ssh/id_rsa.pub from the client system into the ~/.ssh/authorized_keys file on the server.
Copy Public Key Manually
If a system does not have the ssh-copy-id command, you can manually copy and add the public key to the remote server's authorized_keys file.
1. Use the following command to display the public key:
cat ~/.ssh/id_rsa.pub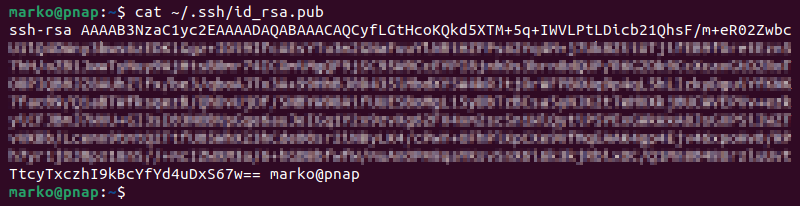
2. Use the mouse to select the entire key, then press Ctrl+Shift+C to copy it.
3. Log in to the SSH server using password authentication:
ssh [username]@[remote_host]Note: If the password authentication is disabled on the server, you cannot establish an SSH connection manually. The only way to access the server remotely is via a console. If you do not have console access, the server is unreachable, and the process cannot be completed.
4. Create the .ssh directory and the authorized_keys file on the remote server:
mkdir -p ~/.ssh && touch ~/.ssh/authorized_keys5. Set the necessary permissions:
chmod 700 ~/.sshchmod 600 ~/.ssh/authorized_keys6. Append the previously copied public key to the authorized_keys file on the remote server. If connected via SSH, use the following command:
echo 'paste-public-ssh-key-here' >> ~/.ssh/authorized_keysReplace paste-your-public-ssh-key-here with the actual SSH public key.
Warning: The >> symbol is used to append content to a file. The > symbol overwrites the file contents. Always double-check that you are using the correct symbol to avoid overwriting important data.
If you are accessing the server via console, open the authorized_keys file using a text editor, like nano:
nano ~/.ssh/authorized_keys Paste the public key at the bottom of the file and save the changes.
Using cat and SSH Together
Instead of logging into the remote server, users can execute the cat command via SSH from a local machine and append the public key directly into the authorized_keys file:
cat ~/.ssh/id_rsa.pub | ssh [username]@[remote_host] "mkdir -p ~/.ssh && cat >> ~/.ssh/authorized_keys" This method uses cat to read the public key, pipes it over SSH, and appends it to the authorized_keys file on the remote server. It also ensures the .ssh directory exists before trying to append the key.
Log In to the Remote Server
To log in to a remote server, enter the following command on the client system:
ssh [username]@[server-ip] If SSH key authentication is set up, the system may not request the user's account password. However, if the SSH key is protected by a passphrase, users are prompted to enter it to unlock the key.
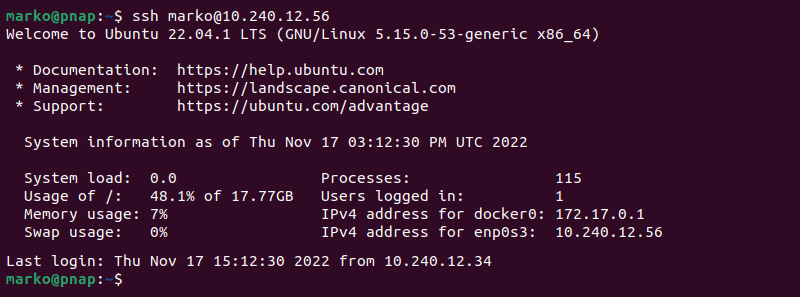
After a successful login, users gain access to the remote server's command line.
Note: In some instances, SSH may refuse the connection and print the "Connection Refused" error. Fix this problem by referring to How to Fix the SSH "Connection Refused" Error.
Set up Passwordless SSH Login (Optional)
Users can add a layer of security by disabling password authentication. The server then accepts logins only from clients with the matching private key.
To configure passwordless SSH logins in Ubuntu:
1. Open the sshd_config file on the remote server using a preferred text editor. The following command opens the file using nano:
sudo nano /etc/ssh/sshd_config2. Search the file and locate the following line:
PasswordAuthentication yes3. Modify the line to disable password-based logins:
PasswordAuthentication no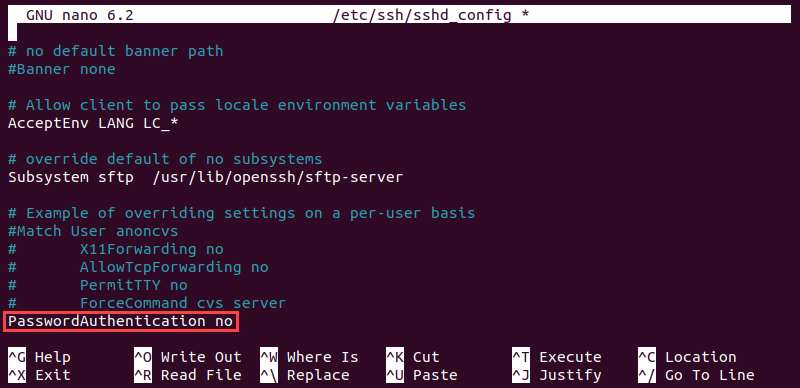
Save changes and exit by pressing Ctrl+X, press Y when prompted to save the changes, and Enter to confirm.
Warning: Before restarting the SSH service, log out and then try to log back in using the SSH key. Confirm that the key-based login works correctly to avoid being locked out of the server.
4. Restart the SSH service:
sudo systemctl restart sshAfter these changes, the server no longer accepts password-based logins.
Conclusion
By following the instructions in this tutorial, you have set up SSH-key-based authentication on an Ubuntu server. The connection is now highly secure, using unique, cryptographic SSH key pairs.
Next, find out what the 19 most common SSH Commands in Linux are.